Archive

Author Archive

Evernote PHP-SDK oauth_token missing

May 18th, 2017 No comments

Many people have problem with this when they want to use the official Evernote php-sdk. The example generates this error on many systems.

Missing required oauth parameter "oauth_token"

The issue happens in OauthHandler.php in function getTemporaryCredentials. There you will find a curl request and if you debug it you will see that it returns an empty result.

$info = curl_getinfo($handle);
print_r($info);
print_r("raw: ".$raw);
die();

Add this parameter to the request and it will work

CURLOPT_SSL_VERIFYPEER => 0

This basically tells you that your PHP installation is missing the required cacert.pem file. So open your php.ini file and find this parameter

curl.cainfo = ""

Download the latest cacert.pem file from https://curl.haxx.se/docs/caextract.html. Copy it to a local folder, I use “C:\Program Files\PHP\extras\ssl” and update the parameter in your php.ini

curl.cainfo = "C:\Program Files\PHP\extras\ssl\cacert.pem"

Restart IIS and it will work. Don’t forget to remove the CURLOPT_SSL_VERIFYPEER value from your curl request.

Categories: IIS Tags: , , , ,

Docker for Windows start-up error

September 25th, 2016 1 comment

After installing Docker for Windows I was unable to run it, following error appeared.

elmore_blog_docker_windows_powershell01

Unable to create: The running command stopped because the preference variable "ErrorActionPreference" or common parameter is set to Stop: The specified module 'Hyper-V' was not loaded because no valid module file was found in any module directory.
at <ScriptBlock>, <No file>: line 76
 at Docker.Backend.HyperV.RunScript(String action, Dictionary`2 parameters)
 at Docker.Backend.ContainerEngine.Linux.Start(Settings settings)
 at Docker.Core.Pipe.NamedPipeServer.<>c__DisplayClass8_0.<Register>b__0(Object[] parameters)
 at Docker.Core.Pipe.NamedPipeServer.RunAction(String action, Object[] parameters)</pre>

I checked that Hyper-V was installed but it seems that Docker also needs to have the Powershell tools installed. So activate the feature and Docker will run fine 🙂

elmore_blog_docker_windows_powershell02

IIS 8.5 Boncode Tomcat Connector

March 4th, 2016 No comments

This guide assumes you have already installed Tomcat Server 7/8. Tomcat offers a connector (mod_jk) but it’s very old and requires a lot of configuration. So I’ll explain how to install and configure the connector from Boncode that’s hosted on RiaForge. This specific example was for an installation of HP Service Manager running on Windows 2012 / IIS 8.5

Installation

Download the latest version from http://tomcatiis.riaforge.org
Extract the .zip-file to a temp folder (AJP13_v1026.zip)

Windows2012_IIS8.5_Tomcat_riaforge_connector_01

Run “dotnetfx35setup.exe” if .NET 3.5 is not yet installed on the server.

Execute “Connector_Setup.exe”

Windows2012_IIS8.5_Tomcat_riaforge_connector_02

Windows2012_IIS8.5_Tomcat_riaforge_connector_03

Windows2012_IIS8.5_Tomcat_riaforge_connector_04

Windows2012_IIS8.5_Tomcat_riaforge_connector_05

Windows2012_IIS8.5_Tomcat_riaforge_connector_06

Windows2012_IIS8.5_Tomcat_riaforge_connector_07

Windows2012_IIS8.5_Tomcat_riaforge_connector_08

Windows2012_IIS8.5_Tomcat_riaforge_connector_09

Windows2012_IIS8.5_Tomcat_riaforge_connector_10

Windows2012_IIS8.5_Tomcat_riaforge_connector_11

Windows2012_IIS8.5_Tomcat_riaforge_connector_12

Windows2012_IIS8.5_Tomcat_riaforge_connector_13

Configuration

The installer has copied the binaries and configuration file to “C:\Windows”

Windows2012_IIS8.5_Tomcat_riaforge_connector_20

Open the file “BonCodeAJP13.settings” and modify the content as below. Feel free to change the path to LogFiles.

<Settings>
  <Port>8009</Port>
  <Server>localhost</Server>   
  <MaxConnections>200</MaxConnections>
  <LogLevel>1</LogLevel>  
  <FlushThreshold>0</FlushThreshold>
  <EnableRemoteAdmin>False</EnableRemoteAdmin>
  <LogDir>E:\LogFiles\APPLogs\BoncodeAJP</LogDir>
  <EnableHTTPStatusCodes>True</EnableHTTPStatusCodes>
</Settings>

Make sure the IIS Application Pool user has write access on the LogDir folder!
A folder named “BIN” has been created in the root of your website. It will be empty so copy these 2 files in it:

  • C:\Windows\BonCodeAJP13.dll
  • C:\Windows\BonCodeIIS.dll

Windows2012_IIS8.5_Tomcat_riaforge_connector_21

Now we need to tell IIS which folders we want to forward to Tomcat. For HPSM this will be “smsso”. Create a new folder in the root of the website named “smsso”

Windows2012_IIS8.5_Tomcat_riaforge_connector_22

Copy the “BIN” folder in “smsso”

Windows2012_IIS8.5_Tomcat_riaforge_connector_23 Windows2012_IIS8.5_Tomcat_riaforge_connector_24

Now add a handler mapping in IIS. Go to the subfolder named “smsso” and add a new managed handler.

Click on image for full version

Click on image for full version

Request path: *
Type: [select BonCodeIIS…. from the dropdown]
Name: BonCodeAll

Click on image for full size

Click on image for full size

Run “iisreset” to reload the settings file

Categories: IIS Tags: , , , , , ,

VMWare PowerCLI script: increase RAM and update VMWare Tools

January 11th, 2016 No comments

The other day I had to increase the memory of 30 virtual servers and install the latest VMWare tools. Instead of doing this manually I uses PowerCLI.

Put the serverlist in a *.txt file that is located in the same folder as the PowerShell script. This will shutdown the server, increase the RAM to 4GB, start the server and then upgrade the VMWare tools.

$servers = Get-Content -Path E:\path_to_my_folder\server_list.txt

get-vm $servers | Shutdown-VMGuest –Confirm:$False

sleep 150

Get-VM $servers | Set-VM –MemoryGB 4 –Confirm:$False | Start-VM

sleep 120

Get-VM $servers | Update-tools -RunAsync

Sourcetree git diff script

August 4th, 2015 No comments

Git is great but it’s not always easy to know which files were changed between commits. I don’t want to deploy all files with each release so I wrote a small script that I use as a custom action in Sourcetree. It’s a batch script that takes 3 parameters:

  • the local path of the repository
  • hash of selected commit #1
  • hash of selected commit #2

sourcetree_git_diff_custom_action01

Batch script is added below, you’ll just need to modify the path to your local git.exe file
it contains a fix for windows users to replace the forward slash of git diff by a backslash

@echo off
setlocal EnableDelayedExpansion

C:\Users\&lt;myusername&gt;\AppData\Local\Atlassian\SourceTree\git_local\bin\git.exe diff --name-only %2 %3 &gt; "C:\temp\a.txt"

mkdir C:\temp\%2
for /F "tokens=*" %%b in (c:\temp\a.txt) do (

set "lineString=%%b"
set "to_replace=/"
for %%f in ("!to_replace!") do set "str2=!lineString:%%~f=\!"
REM echo "%1\!str2!"

ECHO Processing "%1\!str2!" ....

xcopy "%1\!str2!" "C:\temp\%2\!str2!*" /s /i /Y
)

endlocal

Select the 2 commits and execute the custom action. The modified files will be copied under C:\temp\<hash1>\

sourcetree_git_diff_custom_action02

Windows 2008 R2: unable to install SP1

April 17th, 2014 No comments

First time ever I ran into this issue but today I had one server that refused to install SP1. It failed with the error “RPC_S_CALL_FAILED(0x800706be)”. The solution is quite simple if you know it. Download and install the Windows System Update readiness tool. Afterwards try to install SP1 again and it works 🙂

In case it still doesn’t, have a look at the log file and see if there are still corrupt or missing files. You can always copy them from another server. The logfile is located under “C:WindowsLogsCBSCheckSUR.log”

Categories: Windows Tags: , , ,

Windows 2008 NLB configuration: unicast on ESX 5.1

February 13th, 2014 No comments

There are literally hundreds of documents regarding the configuration of NLB running on VMWare ESX Server. Officially they do not support UNICAST mode so I had to configure this without help from VMWare. Below is how I did it, feel free to comment if it can be done better but this is a working example.

high level diagram
ELMORE_Windows2008_NLB_NetworkDesign

As you can see each server in our NLB will have 2 network cards. One for the NLB and another one for direct access which will also act as gateway for the outbound traffic. You only need to configure a gateway on the outbound NIC. Below is an example of the IP configuration. Remember, never check the NLB configuration on the NIC properties yourself. This will be done automatically when you create a new cluster.

ELMORE_Windows2008_NLB_IP_Design

The end result will be similar as the screenshots below
ELMORE_Windows2008_NLB_Manager
ELMORE_Windows2008_NLB_Manager2

Windows 2008 Inbound NIC forwarding

The NLB is active but it will not send back any traffic. Thanks to Michael who wrote an article about this I know that I need to enable forwarding on the inbound NIC. You need to do this on each node of the NLB cluster.

  1. Open a dos prompt with elevated rights and run the following command to see the network name: “netsh interface show int”ELMORE_Windows2008_NLB_forwarding01
  2. That will show you the interfaces in the server.  Find the name of the cluster NIC and put it in quotes in the following command:
    netsh interface ipv4 set interface “NLB 2103” forwarding=enabled
  3. You can confirm that it is changed by running the command:
    netsh interface ipv4 show interface l=verboseELMORE_Windows2008_NLB_forwarding02

VMWare ESX VLAN configuration

We are still not ready as we need to tweak some ESX settings as you can see in the screenshots belowELMORE_Windows2008_NLB_VLAN

DRS also breaks the NLB so we need to keep the VM on the same host. Best is to disable it for all NLB nodes.ELMORE_Windows2008_NLB_NoMove


How to move a VM running in an NLB

  • Stop Host in NLB manager
  • Shutdown VM
  • Move VM to another host or Datastore
  • Start  VM
  • Check NLB

WordPress Architecture theme: show parent page title

December 26th, 2012 No comments

The other day I had a customer who wanted to use the Architecture theme of Goodlayers. On subpages it would show the title of that page while it was better for the customer to show the parent page title. So I modified the theme a bit.

In “/include/plugin/page-item.php” on line 88 you have the function print_page_header

// Print page header
function print_page_header( $header, $bgid = '' ){
if( !empty($bgid) ){
$thumbnail = wp_get_attachment_image_src( $bgid , 'full' );
echo '&lt;div class="page-header-wrapper" style="background: url('' . $thumbnail[0] . '') center 0px no-repeat; "&gt;';
}else{
echo '&lt;div class="page-header-wrapper"&gt;';
}
echo '&lt;div class="page-header-inner-container container"&gt;';
echo '&lt;div class="page-header-inner-wrapper row"&gt;';
echo '&lt;h1 class="page-header-title"&gt;' . $header . '&lt;/h1&gt;';
echo '&lt;/div&gt;';
echo '&lt;/div&gt;'; // page-header-inner-container

echo '&lt;/div&gt;'; // page header wrapper
}

Replace it by this

// Print page header
function print_page_header( $header, $bgid = '' ){

global $post;

$custom_show_parent_title = get_post_meta( $post-&gt;ID , "page-option-show-parent-title", true);
$custom_header = $header;
If (strtolower($custom_show_parent_title) == 'yes'){
$t_custom_header = get_the_title( $post-&gt;post_parent );
If (!empty($t_custom_header)){ $custom_header = $t_custom_header; }
}

if( !empty($bgid) ){
$thumbnail = wp_get_attachment_image_src( $bgid , 'full' );
echo '&lt;div class="page-header-wrapper" style="background: url('' . $thumbnail[0] . '') center 0px no-repeat; "&gt;';
}else{
echo '&lt;div class="page-header-wrapper"&gt;';
}
echo '&lt;div class="page-header-inner-container container"&gt;';
echo '&lt;div class="page-header-inner-wrapper row"&gt;';
echo '&lt;h1 class="page-header-title"&gt;' . $custom_header . '&lt;/h1&gt;';

echo '&lt;/div&gt;';
echo '&lt;/div&gt;'; // page-header-inner-container

echo '&lt;/div&gt;'; // page header wrapper

}

Then in your page (admin interface) add a new custom field called “page-option-show-parent-title” with the value “yes”. Check the WordPress codex if you need help with that.

PDF version of the code-snippets: wordpress-goodlayers-architecture-theme-show_parent_page_title-blog.elmore.be

IIS LogParser scripts

April 17th, 2012 No comments

Not everyone uses Google Analytics or other 3th party logfile parsers. So a customer asked me to create some reports based on their IIS logfiles. The web is full with examples so one more or less won’t make a difference 🙂

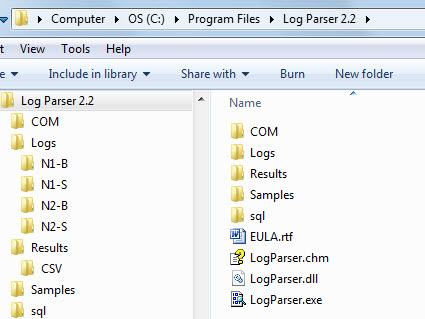
First step is to download Logparser v2.2 and install this on a PC. Doesn’t have to be the server. Default installation path is “C:Program FilesLog Parser 2.2”
Queries can be run from the command line or used via an external .sql-file. I prefer the latter method so I create 3 subfolders: “SQL”, “Logs”  & “Results”. I copied the IIS logfiles to subfolders under LOGS.

Mike Lichtenberg has a demo page with 50-examples to give you an idea what’s possible. Below are 2 simple examples that my customer wanted to have.

1. number of hits per day

Customer (internal webservice) has no stats tool so he wanted to know how many hits this WebService received over a period of time. The query is below, I will explain it afterwards. Save this query in a text-file and name it “RequestPerDay.sql”

SELECT QUANTIZE(TO_TIMESTAMP(date, time), 86400) AS Day, COUNT(*) AS Total
FROM Logs%cFolder%u_ex*.log where cs-uri-stem not like '/loadbalancetestpage.html' GROUP BY Day ORDER BY Day

What we do above is convert the date/time to a timestamp and group them by day (86400). If you replace 86400 by 3600 then you would receive stats per hour but the customer wanted to compare 6 months so we would have received too much output. Notice the ‘%cFolder%’ variable, I do this because there are numerous webservices and this way I can easily target a different subfolder. I also exclude a test-page that it is used by the hardware loadbalancer. Running this straight from the command line would be like this, notice how I pass the folder variable!

Logparser file:sqlRequestPerDay.sql?cFolder=N1-B

It works but not very handy so luckily LogParser supports other methods. Like CSV-export, don’t we all love that! Let’s try the command above again with some extra parameters.

Logparser file:sqlRequestPerDay.sql?cFolder=N1-B -stats:off -o:CSV > results/CSV/ReqPerDay.csv

So, nicely formatted and we can now use this data to create graphs in Excel or in any other tool that supports CSV-data.

2. Hits for a specific page

You know now how it works so we skip the blabla and go straight to the query and the output.

SELECT TO_TIMESTAMP(date, time) AS Day, cs-method as Method,
STRCAT( cs-uri-stem,
REPLACE_IF_NOT_NULL(cs-uri-query, STRCAT('?',cs-uri-query))
) AS Request,
STRCAT( TO_STRING(sc-status),
STRCAT( '.',
COALESCE(TO_STRING(sc-substatus), '?' )
)
) AS Status,
time-taken
FROM Logs%cFolder%u_ex*.log where cs-uri-stem like '/Pages/dymmyname.aspx' ORDER BY Day

Above we are grouping the url and also the status. The advantage is that you would see 401.3 instead of just error 401

Logparser file:sqlBO-Pickup.sql?cFolder=N1-B -stats:off -o:CSV &gt; resultscsvBO-Pickup.csv

The possibilitied are endless so go ahead and try some queries on your own!!

Categories: IIS Tags: , , , , , , ,

Opalis: clear cache

February 10th, 2011 No comments

If you’re using a webservice and you don’t see the latest methods it is necassary to clear the cache.

Delete all *.dll files in “C:Program FilesCommon FilesOpalis SoftwareOpalis Integration ServerExtensionsSupportWebServices2”
They will be automatically regenerated the next time you use them

Categories: Opalis Tags: